Getting Started with GitHub's GraphQL API
Step-by-step is often the easiest way to learn something new, so it’s fortunate that learning GraphQL in JavaScript teaches both the client and the server-side of an application. Seeing both sides of the web transactions is useful, but the catch is you have to learn two environments. The step-by-step mentality can be difficult to apply here, so I encourage beginners to start with a client-side application by consuming a third-party GraphQL API before the server side, which uses a GraphQL server.
GitHub is one of the first major tech brands to adopt GraphQL. They even managed to release a public GraphQL API (official documentation), which is quite popular among developers, because most are familiar enough with GitHub from using it for their own projects.
In this chapter, I hope to cover everything you need to get started with GitHub’s GraphQL API, and learning to use GraphQL in JavaScript from a client-side perspective by consuming their API. You should gain understanding about GitHub’s terminology, and how to consume account data using its GraphQL API. There are a few applications we will implement with this GraphQL API from a client perspective, so it makes sense to invest time into this section to avoid any fundamental mistakes. Afterward, we will transition to the server-side by implementing our own GraphQL server.
Feeding the API with Data on GitHub
If you don’t have an account on GitHub yet, and don’t know much about its ecosystem, follow this free version control course with Git. If you want to dive deeper into Git and its essential commands, check out this guide about it. This might come in handy if you decide to share projects with others on GitHub in the future. It is a good way to showcase a development portfolio to potential clients or hiring companies.
For our interactions with GitHub’s GraphQL API, you will use your own account with information to read/write from/to this data. Before that, complete your GitHub profile by providing additional information so you can recognize it later when it is read by the API.
Exercises:
- Create a GitHub account if you don’t have one
- Provide additional information for your GitHub profile
GitHub Repositories
You can also create repositories on GitHub. In the words of their official glossary: “A repository is the most basic element of GitHub. They’re easiest to imagine as a project’s folder. A repository contains all of the project files (including documentation), and stores each file’s revision history. Repositories can have multiple collaborators and can be either public or private.” GitHub’s glossary will explain the key terms—repository, issue, clone, fork, push—which are necessary to follow along with the upcoming chapters to learn about GraphQL. Basically a repository is the place for application source code that can be shared with others. I encourage you to put a few of your projects into GitHub repositories, so you can access them all later with what you’ve learned about their GraphQL API.
If you don’t have any projects to upload, you can always ‘fork’ repositories from other GitHub users and work on copies of them. A fork is basically a clone of a repository where you can add changes without altering the original. There are many public repositories on GitHub that can be cloned to your local machine or forked to your list so you can get an understanding of the mechanics through experimentation. For example, if you visit my GitHub profile, you can see all my public repositories, though not all of these are mine, because some of them are just forks of others. Feel free to fork these repositories if you’d like to use them as practice, and if you’d like them to be accessible via GitHub’s GraphQL API from your own account.
Exercises:
- Create/Fork a couple of GitHub repositories, and verify that they show in your account as copies. Copies are indicated by the username that proceeds the repository name in all its titles; for example, a repo called OriginalAuthor/TestRepo would be renamed to YourUserName/TestRepo once you’ve forked it.
Paginated Data
GitHub’s GraphQL API allows you to request multiple repositories at once, which is useful for pagination. Pagination is a programming mechanic invented to work with large lists of items. For example, imagine you have more than a hundred repositories in your GitHub account, but your UI only shows ten of them. Transferring the whole list across the wire for each request is impractical and inefficient, because only a subset is needed at a time, which pagination allows.
Using pagination with GitHub’s GraphQL API lets you adjust the numbers to your own needs, so make sure to adjust the numbers (e.g. limit, offset) to your personal requirements (e.g. available repositories of your GitHub account or available repositories of a GitHub organization). You at least want to have enough repositories in your collection to see the pagination feature in action, so I recommend more than twenty (20), assuming each page will display ten (10), or use five(5) repositories when displaying two (2).
Issues and Pull Requests
Once you dive deeper into GitHub’s GraphQL API and you start to request nested relationships (e.g. issues of repositories, pull requests of repositories), make sure that the repositories have a few issues or pull requests. This is so you’ll see something when we implement the feature to show all the issues in a repository. It might be better to request repositories from a GitHub organization where there will be plenty of issues and pull requests.
Exercises:
- Read more about the different terms in GitHub’s glossary. Consider these questions:
- What is a GitHub organization and GitHub user?
- What are repositories, issues and pull requests?
- What are GitHub repository stars and GitHub repository watchers?
- Create or fork enough repositories to use the pagination feature.
- Create pull requests and issues in a few of your GitHub repositories.
Read/Write Data with GitHub’s Personal Access Token
To use GitHub’s GraphQL API, you need to generate a personal access token on their website. The access token authorizes users to interact with data, to read and write it under your username. Follow their step by step instructions to obtain the personal access token, and be sure to check the necessary scopes (permissions) for it, as you will need them to implement a well-rounded GitHub client later.
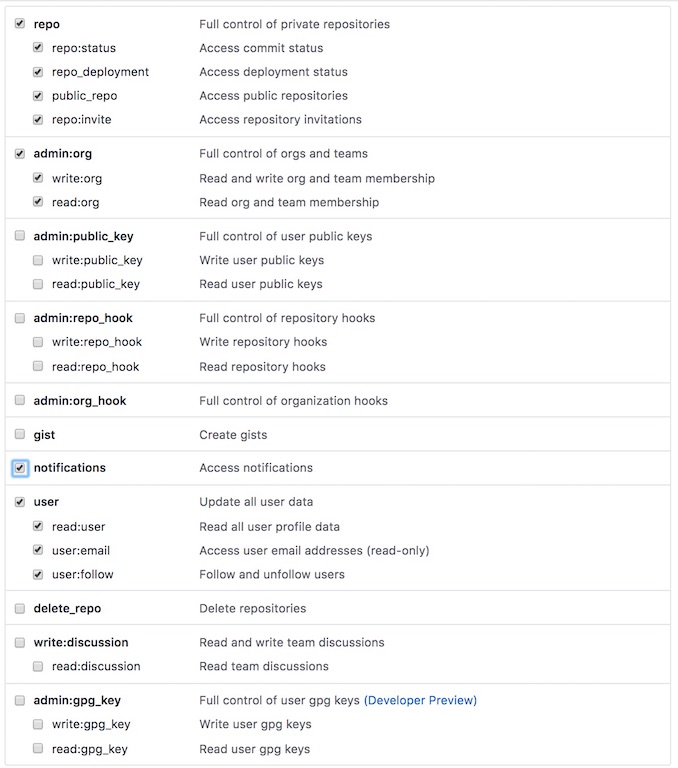
Later, the personal access token can be used to interact with GitHub’s GraphQL API. Be careful not to share these authorizations with any third parties.
Interacting with GitHub’s GraphQL API
There are two common ways to interact with the GitHub GraphQL API without writing any source code for it. First, you can use GitHub’s GraphQL Explorer. You only need to sign up with your GitHub account to perform a query or mutation to their GraphQL API, and its a good way to simplify your first experience. Second, you can use a generic client in the form of an application. GraphiQL is a client that makes GraphQL requests as an integration or as a standalone application. The former can be accomplished by setting up GraphiQL directly in your application; the latter may be more convenient for you by using GraphiQL as a standalone application. It’s a lightweight shell around GraphiQL that can be downloaded and installed manually or by the command line.
GitHub’s GraphQL Explorer knows about your credentials, since you need to sign up using it, but the GraphiQL application needs to know about the personal access token you created. You can add it in your HTTP header for every request in the headers configuration.

In the next step, we add a new header with a name and value to your GraphiQL configuration. To communicate with GitHub’s GraphQL API, fill in the header name with “Authorization” and the header value with “bearer [your personal access token]”. Save this new header for your GraphiQL application. Finally, you are ready to make requests to GitHub’s GraphQL API with your GraphiQL application.

If you use your own GraphiQL application, you’ll need to provide the GraphQL endpoint for GitHub’s GraphQL API: https://api.github.com/graphql. For GitHub’s GraphQL API, use the POST HTTP method for queries and mutations, and to transfer data as a payload to your GraphQL endpoint.
This section provided you with two ways to interact with GitHub’s GraphQL API. Where GitHub’s GraphQL Explorer can only be used for GitHub’s API, GraphiQL integrated into an application or standalone can be used for any GraphQL API. The difference is that it requires a bit more setup. The GitHub GraphQL Explorer is really nothing more than a hosted standalone GraphiQL application tailored to use GitHub’s GraphQL API.
After you’ve set up GitHub to use their GraphQL API to learn about GraphQL, you should be ready to implement your first GraphQL client interactions. Follow along and create your first GraphQL client-side application with the tools you have just set up but also with React.